This is a upgrade of the analog power potentiometer to give you better control over the power level. It´s also easier to remember a number than a location of the pot.
If you want to convert your digital K40 to analog with this solution – check out this conversion article.
How to use it
The volt-meter will show you a number between 0 and 5, this represents zero to full power.
When you cut 2mm acrylic, or other materials you can note the value you need on the meter to easier set up your machine next time you use the same material.
I have a smal piece of tape on my machine where i note all values for what i use the machine for. Please note you need to test what value you need on your machine, they will all be different between the machines.
Tools you need
– Soldering iron and solder
– Wire stripper and cutter
Parts needed
– 10K, 10-turn potentiometer: Aliexpress | Ebay
– 3-wire voltmeter, 0-30 or 0-99 volts. Aliexpress | Ebay
– Knob for the potentiometer, 6mm shaft. Make sure to check specs. on the potentiometer you buy.
– Heat shrink and some cables, 0.5-1mm2 is good enough.
Connect it
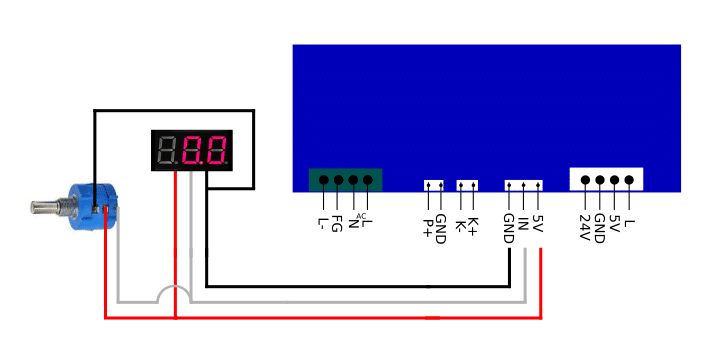
Here is a overview of the connections you have to make.
I did this in a cartoon-ish style, so everyone can understand how it all connects.
There is two approaches to this upgrade.
1: Re-use the cables already on the old pot.
2: New cables from the power supply.
Depending on what you choose, you can splice the cables on the old ones or add new cables all together.
Depending on how your panel looks the length of the wires can vary, look at the schematic above to see how to connect everything and choose the length you need on your machine.
Step-by-step list
I have written a easier step-by-step guide here to solder it all up.
This approach replaces all three cables from the power supply to the pot.
Step 1: Measure how long cables you need from your PSU to the panel, remember to account for the lid opening. As a example: 300mm, cut and strip the ends on three cables.
Step 2: Measure distance between the pot and the voltmeter display, where you want to place it. Let´s say 100mm, cut and strip the ends on three cables.
Step 3: The volt-meter has cables already soldered on it. Solder the 100mm and 300mm cables to them, making a Y-connection. Remember to add the shrink tube over the soldered connection, or insulate it with electric tape.
Step 4: Solder the 100mm ends to the potentiometer, as shown on the picture above.
Step 5: Replace the old cables on the power supply with the new 300mm cables you just made.
Replace the potentiometer in the panel and make a hole for the voltmeter, or just let it sit on top of the panel 😉
If you have the newer style PSU with white connectors for 5V,GND and IN, splice the cable on the old connector. Or buy JST 2.5 XH connectors from Aliexpress or Ebay to make it look a bit nicer.
Thats all for now, power up the machine and check out your now improved power control 🙂

I want to control my air assist power with a button on my panel. Do you know of any diagrams or articles with step by step instructions?
Not much of a diagram needed for that. Run the power cable up to the panel, use a 120 or 240V switch to turn the pump on or off.
You could use high voltage relays and control it with 12v but thats a bit more advanced.
I have the K40 with the 6 buttons to control the laser power. Is it better to keep them or use a potentiometer?
Buttons are just a digital version of the potentiometer, so it works good. Easy to set the power.
But you need a mA-meter to keep a eye on power output. 100% on the panel is 140-150% on the tube – and you will kill it quick.
See here for installation of mA-meter if you dont have one: https://k40.se/k40-laser-electronics/install-ma-meter/
I have purchased a flow meter and mA-meter. I was just wondering should I change the buttons.
No, keep it. If you like it it´s really no reason to change it.
Thanks for your help.
Switch between PWM and Potentiometer.
Hello buddy, firstly want to say thankyou so m much for your prompt response and never condescending help there should be more people like you on all forums your a star thankyou.
I have followed all of your upgrade instructions on my k40, I have a mini Gerbil have converted from digital panel to pot a MaH meter, have been reading on another forum to wire in a SPDT switch to enable pwm control in lightburn do you think I should do this and if so how.
Kind rgds
I have never used the Gerbil board myself. Looking at the pinout in the installation on gerbil website it looks like no switch is needed, and both PWM and LO (to L) is connected at the same time.
Really not sure what the switch would do, maybe a selection between regular pulsed laser and PWM.
You can comment with a link where you read it, i might see what they are trying to do.
Hello, been reading your wealth of knowledge, I have the k40 laser that had the digital buttons on the front not the analogue meter, if I change the control to a potentiometer and meter, how does the laser turn off between moves, as it is I have a jumper cable that goes to the pwm that control on and off and power through software please could you clarify this and what you feel is best.
I test fired my laser the start of the week and the was a loud crack and my laser cracked near the end, water everywhere, I’m worried that it could be an error on my behalf, I’ve fitted the new laser could wiring cause it to blow or is it more likely the coolent want running correct. Sorry for all the questions but it’s so hard to get simple answers.
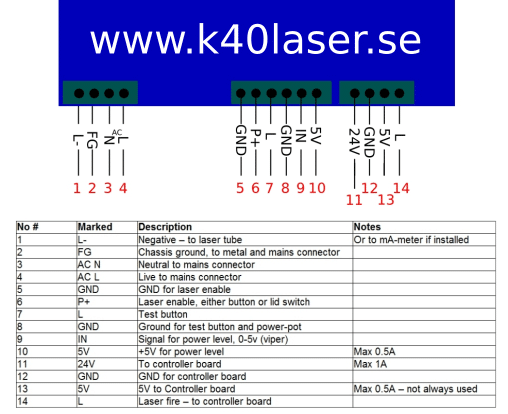
Laser on and off is controlled by the control board, and it does this the L-pin furthest to the right on the power supply. PIN14 in the picture below.
There is more L-pins but these are connected to the test-buttons only.
Only jumper cable you should have is the one between P+ and gnd, if you dont have a flow sensor. (pin 5&6 in pic below)
Check this picture to confirm your connections.
Hi, I have an analogue meter which I fitted as more accurate than the led voltage reader. I would like put a voltage dial connected to my analogue meter to adjust voltage as machine is running. Is this possible? Many thanks
Yes, follow the guide in this article. You do not connect any regulation to the same cable as the meter is connected to, check the guide for proper inputs.
Bought accidentally 2 pole (wire) instead 3 pole (wire) voltmeter.
Can you PLEASE make one scheme for us retarded who dont know how to connect 2 pole voltmeter to the PSU Type 1 (according to your site).
I will be VERY VERY grateful, because I have limited electronic knowledge.
Thank you very much in advance.
Use the same schematics as in the pictures on the article, but put the red wire where the white is. It might work.
The voltage might be too low to run the meter on low power though so it might turn off on low power, you need a 3-wire if that happens.
I also purchased the digital 6 button touch pad K40. The pin out/wire color is different than the rheostat version.
Red White Yellow Pink left to right. The extra assumedly is for the laser test button. What colors are the 5v, ground and control voltage to connect the 10K rheostat and volt meter?
The colors are widely different depending on who connected the machine and sold it.
Always look at the PSU for IN, 5V and GND – and then connect it to the potentiometer. If you do it wrong, it will go backwards so no big deal.
IN comes from the “wiper”, 5V and GND to each side of it. Check for markings on the 10K you have.
I connected the potentiometer. Always reads 5v at meter. My IN wire has 5v all the time even when not connected from pot. Is this normal. Is the pot pulling the in wire low to adjust the output power? Or do I have a bad power supply.
Remove the cables and measure on the PSU, you should have 5V on the 5V, nothing at IN. If you get 5V constant on IN, turn the cables around from the potentiometer so you swap the 5V and IN cables and see if it changes.
Everything disconnected. Plug removed from power supply. The IN pin at the power supply has 5volt I think the power supply is bad. I now know why it turned my thin projects into a melted mess when cutting. Hopefully it did not damage the tube. I also found a damaged focus lens. It has chips on the outside corner. Thank you for all the help.
I have recently purchased the K40 and will be doing many of your upgrades soon. One of the first I’d like to tackle is change the digital 6 button touch pad to the analog potentiometer. Will you come out with a video or write up on how to do this as a DIY project? That would be really useful.
You can use this guide for that upgrade. The digital panel is connected on the same pins, just remove it and replace with the pot.
You mentioned to use a 0-30 or 0-99 volt 3-wire voltmeter. What would be the difference? Is one preferred over the other? Thanks for all the info you provide. It is invaluable.
No difference, the voltage from the PSU is between 0 and 5 volts, where 5 volts is max power, 0 volts no power. Most meters are 0-30 or 0.99 – which one you use is the one you can find locally, or order online. A 10v meter would work too!
Thanks. I am trying to wire mine up today. First attempt decreases the mA as I turn right. Swapped 5V and ground as you suggested above and it does increase as I turn right but something is still not right. First, the mA go from 0 to about 1,8 instantly and never go any higher. It also seems to react differently whether I have the laser armed or not. Have you seen this behavior before? Thanks.
Test the output of the PSU to begin with, you want 5V on the 5V line, and not anything else, no less than 4.5V. If this value is different with or without the laser enabled, there is something strange with the wiring in the machine.
5V was good from the PSU. However, while I had the multimeter out I tested the pot and it was bad. Replaced the pot and all is well. Thanks again for all the help.
Hi,
why do you use a 10k potentiometer? In my K40 is a 1k and in other post I read that they replace with 5k.
What size is the right one? Thanks.
K40´s has been delivered with different pots through the times. 1k, 5k or 10k doesn´t matter.
Thanks for your fast answer 🙂
Great artical. would have a diagram for the newer power supply.
I want to get rid of my digital unit. add ammeter, also install pot for control and a test fire button.
spent hours tralling the net and getting confused.
your write up seems very straight forward.
Greatly appreciate any help.
thanks in advance.
p.s my power supply has the green connectors.
There is a article coming on this. You can find a picture here explaining what goes where ->
So, judging by that picture, the connections for the green connector PSU are:
Pins 5 & 6 -> Laser enable switch (already connected)
Pins 7 & 8 -> Laser test button
Pin 8 -> Pot top and volt meter black wire
Pin 9 -> Pot bottom and volt meter white/grey wire
Pin 10 -> Pot middle and volt meter red wire
Is that right?
Yes, but, if its top, botttom or middle on the pot varies between manufacturer on the potentiometers. Positive and negative is the 5V and GND, the viper/output goes to the IN pin (9)
I haven’t yet received my K40, but I have a question about the PSU.
On my 100W laser, I can adjust the maximum output of the psu so I don’t ever go over the rating for the tube – is that not possible with the K40 power supply – is everything controlled by the pot on the control panel?
So… incautious use of the dial can overdrive the tube, easily?
Yes, a MA meter on the k40 is a must, and keeping it below 16-18mA
I tried to instal a 10 turn Pot and i have two issues. First It appears to turn the wrong way, turning counter clockwise increases the mA. Second. I don’t seem to have any resolution between 0mA and about 15mA. Can you help?
Change the position of 5V and GND cables, and it moves correct again. It probably solves the problem you have with no power in the lower end.
Do you have a link to the conversion from digital to analog you mentioned in the article?
Ah, it got lost when i remade the website. I´ll see if i find it in a backup again.
Hi,
seems that you didn`t find it?!
No, i have made a new one though, needs some photos and it´s live.
can that Pot just be used as a replacement? Rather than adding voltmeter?
Yes
So if I understand correctly, The POT wiper wire and the middle wire (mine is yellow) on the digital meter go to the “IN” on the Power source. The red wire on digital meter goes to the 5v power and the black goes to Ground power.
Thanks for you post!!!
It depends on the POT, check the markings on it. Some have the wiper on the edge away from the knob, others in the middle. You will notice it quick, if the voltage doesnt move, or going the wrong direction you have another type of pot. But you can google “potentiometer wiper” to see what the symbol looks like.
Thanks for the post. Just wondering if I can keep both the amp meter and have the 3 wire volt meter on the same pot?
Thanks you.
Yes, and its recommendet to keep the mA-meter too, as the volt-meter only give you reference for cutting or engraving power, not maximum as the mA-meter can give you details about.
Thanks for the answer! And I’m supposed I’m right by doing the following?
Replace poti which is in k40 now with the new one and just wire the voltmeter into the circuit and I should be fine?
Yes, just make sure you grab a 3 wire meter and put the sense wire on IN wire to the PSU, if not it will die because the volts goes down lower than it needs to light up 🙂
Hello!
Thanks for the great guides your site is the best resource for information on the k40 🙂
I have one question, this replaces the already existing potentiometer right? Can you set the laser power while the laser is not firing with this mod?
Thanks! You can set the power when you want, while firing or idle, it doesn´t matter. I use to tweak my cutting with the power knob while cutting to get the best result.
Thank you.
Im having a problem. Wired like the diagram showes. Problem is my mA meter at full power is only registering 4mA but I know it really more than that. With the old pot it showes full power at 20mA. It the same pot,3590s-2-10 as you show with the wiper in the center.