The K40 in stock status is very dangerous. If you just bought a K40 please, do not connect it to a wall outlet until you have read this guide completely and made all test described here.
If you have any doubts about measuring electricity or feel uncomfortable you should hire a electrician. Please note that regulations and laws in your country might be different than for me in Sweden.
What we will test in this article
– Grounding
– Verify good crimps and cables for power
Tools you need for check your K40 laser machine
– Multimeter
– Screw drivers, philips and regular
– Socket or pliers for the nut on the ground pin
– Cable ties or cable socks/sleeves to tidy up your installation
– Good quality cable crimps and tools for this – if you need to fix bad crimps
Here is the machine bought for this article series

The control panel.
This is one really stupid. The input power is routed through the e-stop which is perfect. After the e-stop it goes to the black switch on the right to the e-stop and then down to the power supply.
The green switch is just a connection coupled to the laser enable pins on the PSU, it will not light up and this one can be dangerous to beleive the machine isnt turned on until this is pushed – it´s fully powered already when the black switch is on.
We will fix this in a later article.

Let´s dig in!
First test to do is to check the grounding in your laser machine.
Put your multimeter in resistance mode (ohm). Put your red and black test probes together and look at your multimeter how it reacts to a good connection – some beeps and others show 0.00 in the display.
Here you can see how my multimeter reacts.
If you have a more advanced multimeter, you might have a continuity mode where you can measure connection between two points and it will show if you have continuity between the probes.
This is how my multimeter shows on the display with and without continuity (connection).

How to measure
It does not matter which probe you put on what pinout, as we are only measuring the continuity (connection) between the probes here, but for easier description i will show you how i do it.
Put the red probe anywhere on your metal case on the laser machine, in this example i do it on the floor in the PSU compartment. Chose a spot without paint, or scratch a bit so you can put the probe on bare metal.
Put the black probe in these locations.
– Top of the PSU (make sure you go through the blue plastic)
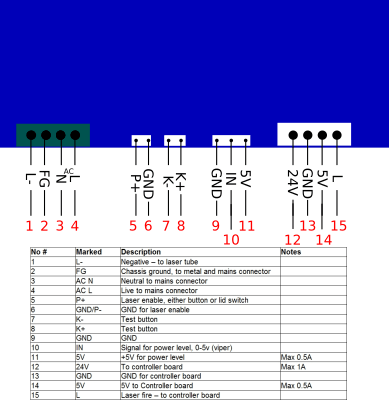
– ALL GND and FG-pins on your power supply (psu) See pinouts here
– Base of your gantry (not the moving part)
– Negative pin on the laser tube (left side standing in front of the machine)
– Ground pin in the rear of your machine
Now, move the red probe to the rear ground pin in the machine.
Put the black probe on these locations
– FG and GND pins on the PSU – see pinout here
– Negative pin on the laser tube (left side standing in front of the machine)
You want to see 0.00 in all these locations – based on how my multimeter shows – see picture further up.
If you did not have 0.00 or similar effect in some location, you need to inspect this cable to see if it´s a bad crimp or damaged cable causing it. Replace with a new cable if needed.
So, whats next?
Inspect your cables, use a bright light and check your PSU (power supply). Pull the cables, not hard but hard enough you can feel they are crimped properly.
Do the same with all the crimps in the rear of the machine connected to the outlet and ground pin.
Visually inspect and feel with your hands on the cables that they do not have damages or frays/strands pointing out on the side of a crimp, if you have – cut them and insulate with tape or heat shrink.
Over to the ground pin
The ground pin in the rear of the machine is made for Chinese electric standards, they do not often have ground in their wall outlets and if they have it´s often really shitty to speak without restriction.
This ground pin is not needed if you have ground in your wall outlet – please note, you still need the bolt grounding the wire to your metal, but do not connect a extra ground if you already have ground in your wall outlet. This can cause ground potential differences and cause problems with the controller board.
Here is a picture of the ground pin in this machine. I have a crocodile clip on it to measure it easier.

Some machines has a insulated pin with plastic washers on either side of the bolt, others has metal washers.
Check out the pictures below how you make the grounding better in your machine.
Step 1
Remove the ground pin
Step 2
Remove some paint around the hole, make sure it´s bare metal. Use a old knife, dremel or sand paper – whatever you have around.
Step 3
Replace the pin with a good bolt and washers shown in the picture, when writing this i can´t remember the name of them in English 🙂
If you do not have ground in your wall outlet, use the stock pin again which allows you to add external ground wire.
Step 4
Mount the ground bolt in your machine again, make sure everything is tight and all ground cables are back on the bolt.
Do a continuity test with the multimeter to be sure it works.
Tidy up your wiring – Optional
If you want you can now use the cable ties or cable sleeves to tidy up the wiring. I like to keep the high and low power cables separated and i use cable socks/sleeves for this.
You are now done with the basic tests and fixes for the machine and can safely turn it on.
Hi, I wanted to ask if you had alrady time to check out the “new and improved” exhaust system on the machine… i got my laser today, and it looks like the one you bought for this series, and it has a a completely new exhaust system built in it seems…
I already have got 2 Inline axial radiators with 300m³/h each as i want to use the machine in my home.
do you think I should remove the stock fan and just print a connector as it obstructs airflow, or do you reckon it is good and adds some pulling power.
the plan with the inline vents would have them sit in parallel at the end of the exhaust tube in a box outside of my window, so i can vent up to 600m³ air per hour if i turn them both on on full.
I´m going to remove it in my machine, it works now for testing and stuff but i´m going to use my inline-fans mounted at the window (better suction, less static pressure = better flow).
Adding more fans to the line wont double the effect, it might increase a bit but the efficiency is decided by the lowest performing fan.
You can see this effect with computer fans on youtube, search for “fan stacking”.
Most fans in our application have high air flow, but low static pressure. It means its good at sucking but bad at pushing (not 100% true, but to simplify) – the fans works best if they are mounted at the end of the hose just sucking. If you put them in the rear of the machine, they need to suck + push air through the hose and that needs higher pressure on the fan. So it will do the job better mounted at the end. I have a 2m hose from the machine and a fan on my window with a 20cm small hose going outside. I have tested with smoke and it´s proven better this way, it´s also supported by doing the math on the fan, hose and volume it can move.
Thanks for the answer, I didnt want to smoke up my house if I first try it.
I’ll remove the built in fan (should also alleviate some load from the PSU) and use my fan box.
to clarify, I wont have the fans in series but rather in parallel in a box so it would look something like in the (admittedly very bad) diagram. Having the fans in parallel ( especially as they are both exactly the same), is not affected by the same problems as fan stacking, as they are not in series. It basically doubles the blade area the fans can use compared to one, thus increasing the volume transported. (oviously, it wont fully double the output, as they compete a little bit for the pressure gradient, but definitely more than fan stacking)
thanks four your fast reply. Your site was one of the main reasons I now have a laser 😉
Perfect, that is better than in series! You will get good flow speed in the hose with that solution. Add a charcoal filter to that box too and you remove some of the smell if you have neighbors close to the exit or get smell back in to your house.
Thanks for the tipp with the charcoal filter, I think I’ll order that as well…y postman must think I started a huge Cannabis plantation, as the only local shop that sells good consumer grade vent equipment for a reasonable price is a grow shop…. But at least they have pretty heavy duty carbon filters 😀
Hah, you might get a visit from the Police. I got nuclear safety board to visit after i asked around on a nuclear facility about very very pure water to test conductivity in laser tubes, they were a bit worried at first ?